shopping_cart 0 $ 0.00
Added to Cart
  • You have items in your cart
    You have 1 item in your cart
    Total

    Otso Journal — Voytek

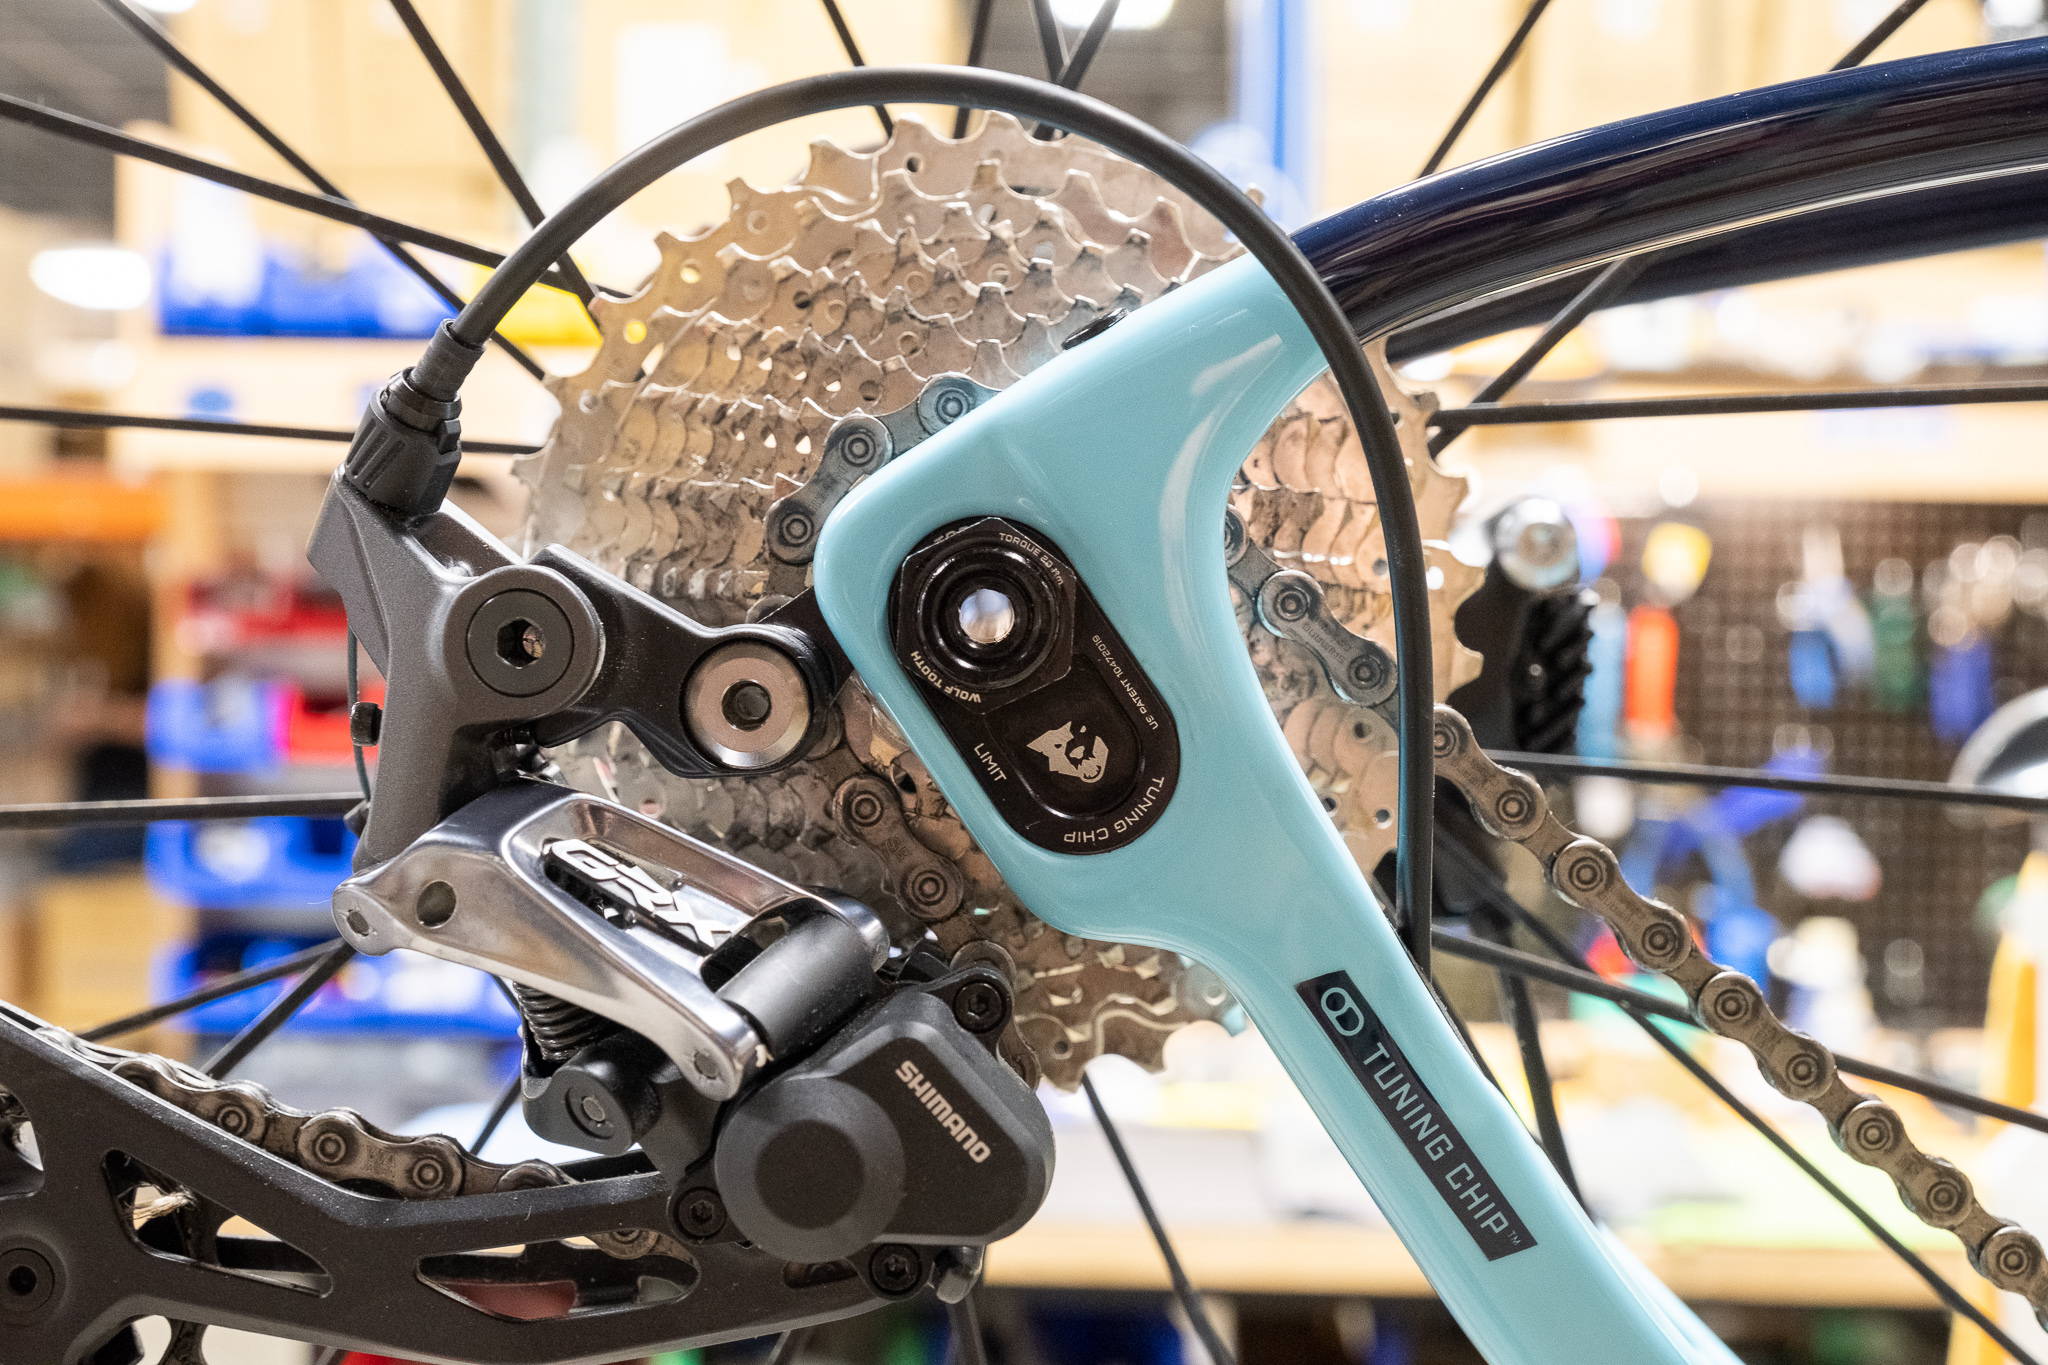
    Tuning Chip Technology on Otso Bicycles: Everything You Need To Know

    What is the Tuning Chip, and what does it do?

    Our patented Tuning Chip rear dropout system is found on all bike platforms in our collection, and adds an element of versatility to any Otso Cycles bicycle purchase that can make your bike feel like three different machines.

    The Tuning Chip has three different positions, and each position gives each of the bicycles in our lineup a different riding experience. You can adjust your wheelbase by as much as 20mm, and your bottom bracket height by as much as 4mm. In the rear position, you’ll find more stability and comfort and a lower bottom bracket height, as well as have maximum clearance for larger tire sizes. Switch to the front position to get more agile handling and responsiveness, as well as a higher bottom bracket height. In the middle, well, that’s the best of both worlds.

    The Tuning Chip can easily be switched at home with just a few tools and this simple guide. All parts can be replaced if needed.

    What Parts Make up the Tuning Chip System?

    Part #

    Part Name

    Torque

    1

    Bike Frame

    -

    2

    Left Dropout with Disc Brake Caliper Mount

    -

    3

    Right Dropout with Derailleur Hanger

    -

    4

    T-Nut

    -

    5

    M6x16 with Captive Washer

    10 Nm

    6

    Thru Axle

    12 Nm

    7

    Dropout Nut

    20 Nm

    8

    Tuning Chip - Forward or Back Position

    -

    9

    Tuning Chip - Middle Position

    -

    A Simple Guide to Adjusting Your Tuning Chip

    Tools needed:

    Tuning Chip Installation and Adjustment Instructions:

    1. Remove rear thru axle using a 5mm hex wrench, then remove rear wheel.
    2. Remove left and right dropout nuts using a 20mm socket (never use a cone wrench or adjustable wrench).
    3. Loosen M6 bolt on left dropout one full rotation only using 5mm hex wrench. Do not loosen this bolt more than one rotation, unless steps 4 and 5 are particularly difficult. If you have to loosen more, make sure to hold the T Nut so it sits in its intended slot behind the dropout.
    4. Remove both right and left Tuning Chip. Use a screwdriver to push from the back if needed.
    5. Slide dropouts to new location and replace Tuning Chip in desired new position (or install new Tuning Chip if needed for desired position). Note that it will also be necessary to slide the brake hose and derailleur cable forward or back.
    6. Thread dropout nuts on by hand until snug, then tighten to 18-20 Nm using a torque wrench.
    7. Tighten dropout slider M6 bolt to 10 Nm using a torque wrench.
    8. Replace rear wheel and axle and tighten axle to 12 Nm using a torque wrench.

    Notes:

    Always adjust the rear derailleur B-screw after changing chip positions. Familiarize yourself with properly adjusting your rear derailleur using the manufacturer's user manual or by bringing your bicycle to your local bike shop.

    Chain length may also need to be adjusted when changing chip positions.

    5mm Hex Wrench, 5mm Hex Torque Wrench, 20mm  Socket Torque Wrench, Wolf Tooth Pack Wrench, Wolf Tooth 20mm Pack Wrench Insert
    Hand removing Wolf Tooth thru axle from Otso bike rear wheel
    Removing dropout nut from Otso bike
    Loosening M6 bolt from left Tuning Chip dropout on Otso bike
    Holding front/back Tuning Chip next to Otso bike
    Holding middle Tuning Chip next to Otso bike
    Hand tightening dropout nut on Otso bike
    Using a 20mm socket torque wrench to finish tightening dropout nut on Otso bike
    Using 5mm torque wrench to tighten M6 bolt on Otso bike
    Using 5mm torque wrench to finish tightening thru axle on Otso bike

    Rear Tire Size Compatibility Charts for each Tuning Chip Position

    Each Tuning Chip position affects the rear tire compatibility, so we've included this section to help determine which rubber you can safely pair with your Otso build. The further back your rear wheel sits, the wider the tire that will fit.

    Regarding front tire compatibility, if using something other than the Voytek carbon fork on the Voytek, or the Lithic Carbon Fork on the Waheela C, Waheela S, or Warakin, please check with your fork manufacturer for their recommendations on maximum tire size.

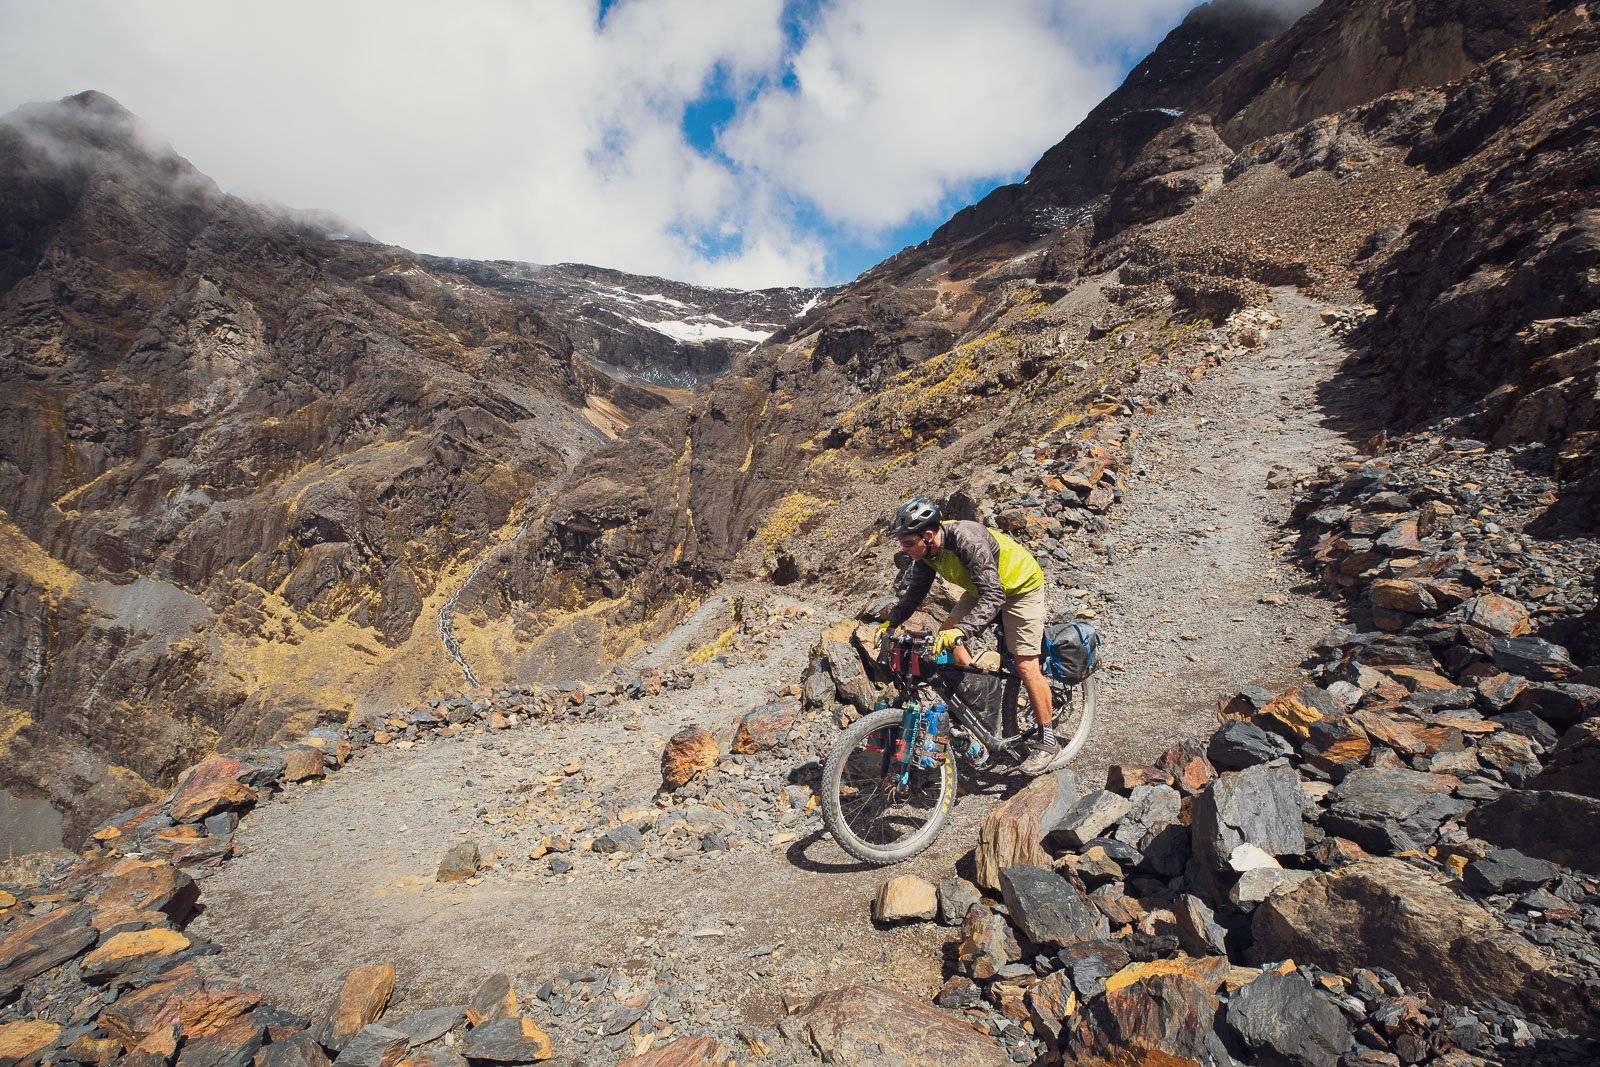
    Traversing the Andes on the Otso Voytek: Bikes and Gear

    Otso Ambassadors Mark Watson and Hana Black have been on the road for the past three and half years, slowly making their way along the American Cordillera from Alaska to Patagonia. With 44,000km of riding behind them they have racked up a wealth of experience in conditions ranging from the highest Andean passes, to the Atacama desert, the Amazon jungle, and everything in between.

    Since Cusco, Peru they have been riding a pair of our Voyteks which have been put through their paces with over 6000km of mountainous riding in Peru, Bolivia, Chile and Argentina.  

    Here, Mark shares some of his thoughts about the Voytek and how they set their bikes up for long distance bikepacking. 

    If you are interested in seeing more about Mark and Hana check out their social media posts:

    https://www.instagram.com/highluxphoto/ and https://www.instagram.com/beinghana/

    and website: www.highlux.co.nz

    Frame & Fork

    The only carbon framed bikes we’d previously owned were our road bikes back home in NZ, so using a carbon bike for the rigours of heavily loaded wilderness bikepacking was something that was new to us. There seems to be a common misconception that carbon frames, for bikepacking, are only suitable for relatively light loads, such as might be carried in bikepacking races or shorter tours, and for some bikes, this is true. However, after using the Voytek for six months now, on the gnarliest bikepacking trails and with loads that have included up to 18 days food and 13 litres of water at a time, I feel confident taking the Voytek anywhere and have no qualms riding the bike on the roughest of tracks with a load on board.

    The size of the tubes and the bottom bracket cluster of the Voytek suggest that it’s probably a stiff bike, and indeed it is, which is very much in the bike’s favour when you load it heavily and hit back country trails. Climbing, accelarating and riding standing up, little is lost to frame flex. Our Surly Ogres were like wet noodles in comparison. Whether it was a deliberate decision by the Otso engineers, or just a side benefit, somehow the geometry of the bike seems to nail the sweet spot for loaded riding too, with the bike being confidence inspiring on steep, technical and sandy tracks. But it’s important to note that how the bike handles loaded is also a product of how you pack and distribute your gear – more about that later.  

    The fork we are running on the bikes is the Salsa Kingpin Deluxe, because it has a double set of mounts for cargo/water cages, which we like to utilise for a balanced load and extra water capacity. Something else that has been a stand out for us has been shifting from regular quick releases (as we had on the Ogres) to through-axles front and rear. These ‘tie’ the bike together with a stiffness that quick releases can’t match, improving handling, especially with a load and keeping the bikes quick and responsive on all terrain.

    Wheels & Tires

    Although the Voytek can take up to 4.6 inch tires (with a 26 inch wheel), our requirements for long distance bikepacking are best met with the combination of a 27.5 inch wheel and 3 inch tire. Neither of us are particularly tall, so 27.5 (especially with a 3 inch tire) suits us best for technical riding. Because the clearance of the frame is designed for a fat tire, when running 3 inch, we have a ton of clearance all around both wheels which makes riding in mud a breeze. Conditions would have to be really bad for this wheel combination to get clogged.

    We have spent a lot of time in past months in sandy regions and on sometimes very rough roads (with no suspension fork) so 3 inch tires have been our go-to as they strike a balance between efficiency-over-distance and traction/float. However if you were running a suspension fork, or riding firmer and less extreme conditions, 2.6–2.8 would be ideal for long distance riding on this bike, giving you even more generous clearance for mud. Likewise, were we on a shorter trip with desert riding or rocky trails, we’d probably opt for a 4 inch tire.

    Our rim of choice, the Hope Technology 35W, is at the narrow end of the spectrum for a 3 inch tire (40mm external), but the reason for this is that plus size tires are very difficult/expensive to obtain outside of a select few cities in Latin America, so we like to have the option to run a more widely availble tire size, such as 2.35, in an emergency. A narrower rim saves us weight and we like that this model is also eyeleted for longevity.

    The traditional school of thought for heavy loads and long distance is that 36 spokes are the way to go, however, in general plus rims have greater inherent strength making 32 spoke wheels sufficiently strong as long as the rim is eyeleted, they have strong spokes and are correctly tensioned. We have not broken a spoke on these bikes yet.  

    Hope Technology supplied us Fatsno Pro 4 hubs to combine with their rims and so far these have not skipped a beat, despite some extremely wet and dusty riding conditions for days at a time.  

    Drivetrain

    Riding these Voyteks was the first time either of us had used a 1x drivetrain (Sram Eagle GX), which again is a system that has its skeptics when used for long distance bikepacking. We have found that the pros, so far, outweigh the cons of these drivetrains for touring, but this will also depend on the riding style and requirements of individual riders.

    For us, with older knees and a penchant for finding rough and remote roads that are often steep, an easy climbing gear is key. So we paired the 10–50 12-speed cassette with a 28 tooth Wolftooth CAMO stainless chainring, giving us a minimum (easiest) gear-inch of 16.24, which has been enough, even with nearly 3 weeks food on board. We do get ‘spun out’ riding paved descents, but while touring this is not an issue for us. If were running a consistently lighter load (say for short trips back home) we’d use a 30 or 32 chain ring.

    Eliminating the front deurailler saves weight and improves mud clearance, providing a more capable bike when conditions are bad and after six months now we have not missed our big chainrings at all.

    We put new chains on the bikes after roughly 1800km of tough riding but due to lack of availability didn’t try to change them again until we’d done nearly another 4000km, by which time the second chain had stretched enough to have worn the chainring causing the new one to catch badly on the teeth. Interestingly that third chain seemed to work ok with the cassette, but this probably confirms that 12 speed chains do stretch faster than 10 and 11 speed, and require regular changes to extend longevity of the rest of the drivetrain.  

    Brakes

    As much as we love hydraulic brakes for trail riding and short trips, for us the best option for long distance and remote riding are mechanical disc brakes. The consequences of tearing out a hydraulic hose or snapping a brake lever (as we did on a high pass once in Peru) are too great. At least if you break a front brake lever with a mechanical brake you have the option to swap the cable to your rear brake lever.

    Mechanical systems are more reliable and maintenance free, and depending on your system, the pads will usually be more widely available in Latin America too. We prefer the TRP Spyke as it has two active pistons (unlike the Avid models which only move on one side). This gives the brake a more modulated and hydraulic-like feel. We pair them with 180mm rotors front and rear for better braking with a load, and this also extends the life of the pads and rotors compared with smaller rotors.      

    Handlebar

    Having both experimented with different handlebars over the years, our preferred bar for long distance riding is the Watson (no relation) Cycles Revelation titanium handle bar. Ti is a good choice for long distance bars because it is extremely strong, making it reliable for many thousands of kilometres of rough riding, and is also more shock dampening than aluminium. This bar is 680mm wide with a 32 degree sweep, which we find hits the sweet spot between comfort and suitability for technical riding. We’ve used this bar since day one and have never once wished for bar ends, or any other kind of bar.    

    Luggage

    For ideal bike handling in a range of conditions, an even distribution of the load over the bike is key. Revelate Designs supply us with their excellent bikepacking bags and we use a range of their models, as well as custom mini panniers to achieve both optimal load distribution as well as luggage capacity to suit longer distances between resupply. This system was pushed beyond capacity when we rode the Ruta de los Seis Miles Norte (18 days no resupply), so we extended our capacity with lighweight drybags attached to the decks of our Axiom Fatliner racks.

    In our front harnesses we tend to carry bulky but light items such sleeping bag, tent, down jacket, sleep socks, leggings and sleeping mat, while the fork bags hold the rest of our spare clothing and rain wear (for quick accessability). The framebag, with its low centre of gravity position, is best for heavy items such as my camera lenses & spare tire sealant. It also works well for water or in Hana’s case; multiple small but dense items that she likes to keep quickly accesible. Items that we most rarely use, such as spare inner tube, brake pads, spare parts and day packs are kept in our downtube bags and Wolftooth B-Rad roll top bag. Laptop, minimal toiletries, food and cooking equipment occupy the mini panniers, while other small and frequently used items go in our Revelate Designs Egress Pockets, up front.

    Summary

    Overall, our ethos towards long distance touring and bikepacking is to remain agile. We ride with loads that are light and consciously selected, but not ultralight. This is enough to keep our choice of roads and tracks wide open, and gives us plenty of options for where we chose to carve our southbound trail.

    Secondly, and just as important, is the choice of bike. For us, having a bike that is equipped to deal with the worst a trail might throw at it, means that it’s rare that we feel out of our depth, and it keeps the riding (mostly) enjoyable. It’s about having a bike that’s capable on all sorts of surfaces and that allows us to make the most of the riding, not riding one that just manages to cope. The bottom line after all is to have fun, and for us a light plus-tired bike with generous tire clearance is the perfect tool for this. As we’ve experienced ourselves and witnessed with other cyclists over the past 44,000km; if you are riding mixed surfaces, including pavement, the advantages of a plus-sized tyre on all dirt surfaces will always greatly outweigh its minor disadvantage of added rolling resistance on tarmac – after all, what’s 10 minutes extra at the end of a 10 hour day?

    Bikepacking on a School Night

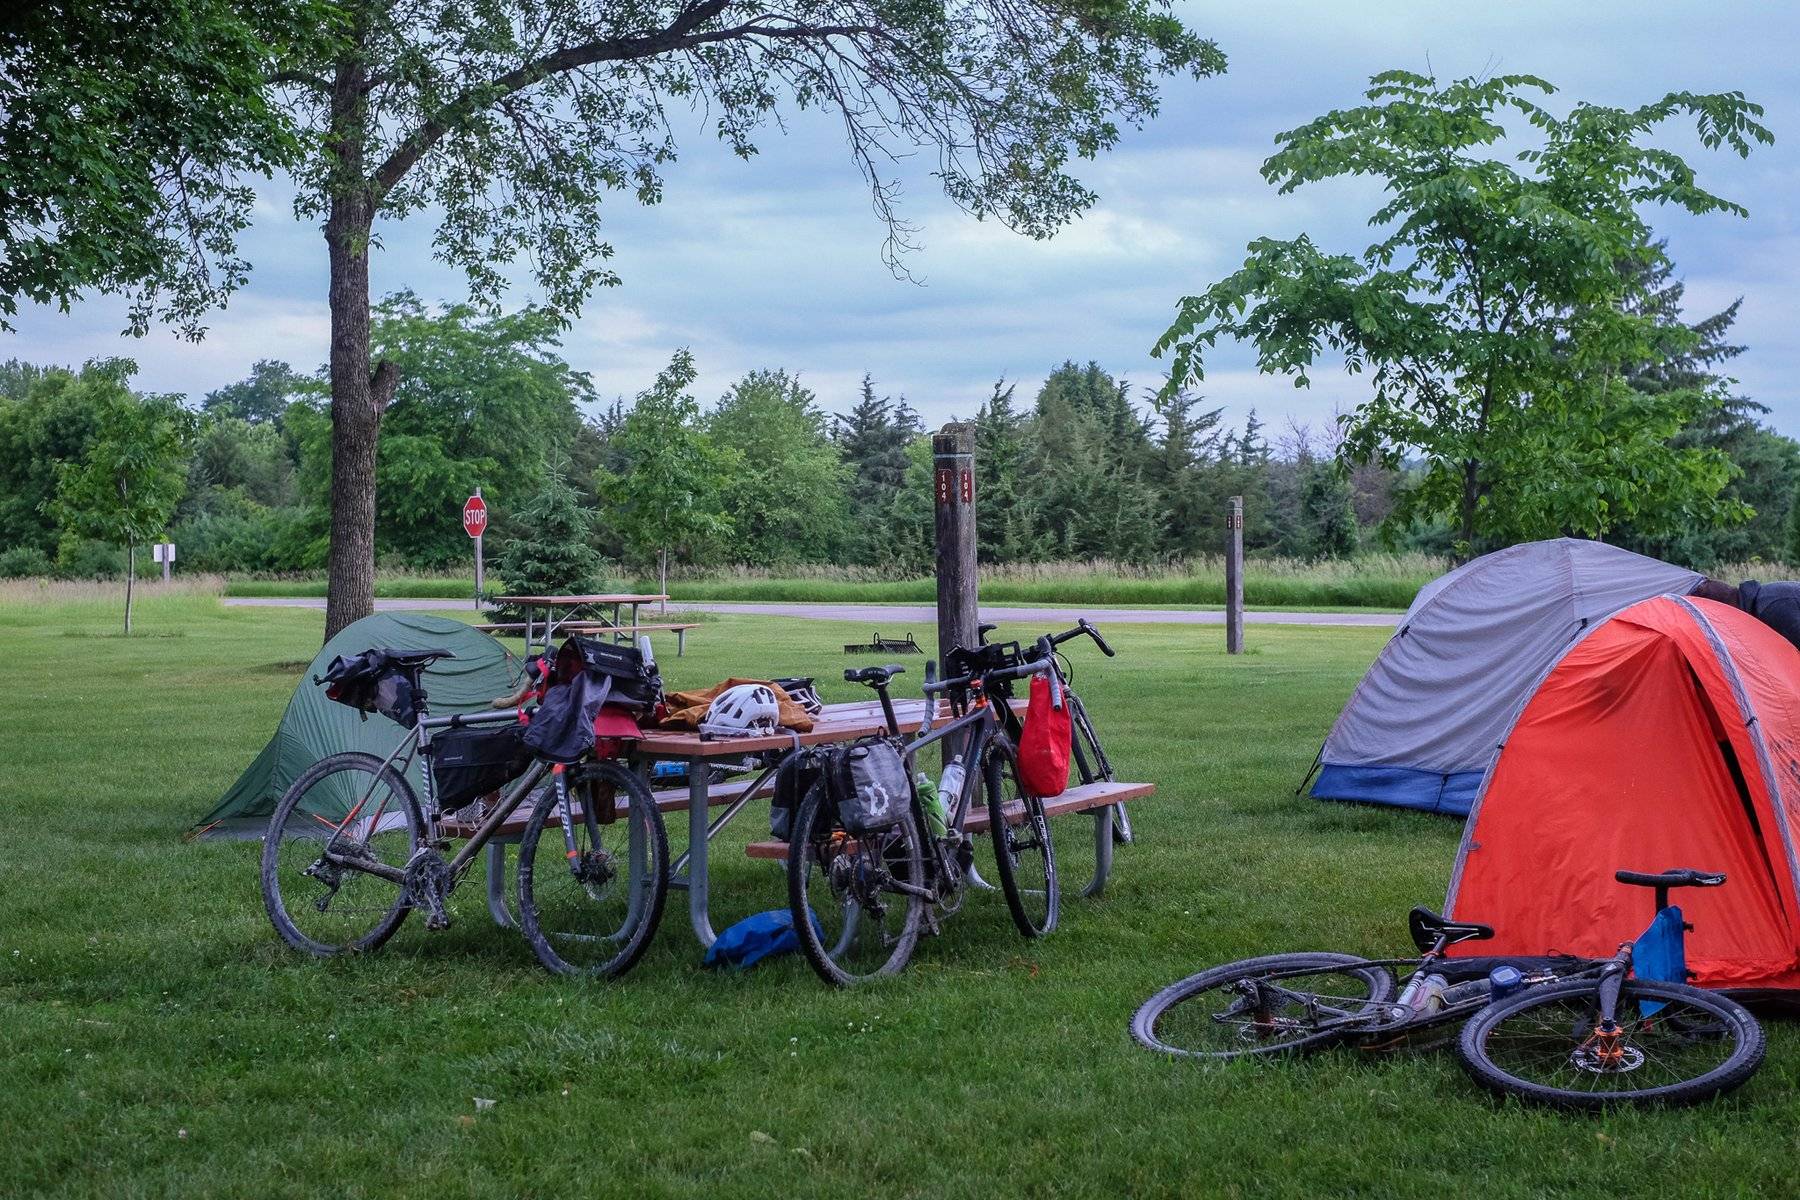
    Bikepacking laughs at the best laid plans. That’s just how it is. At least that’s how it’s been in the half dozen or so trips I’ve been on. Extreme heat, severe weather, closed restaurants, miles of mud, just so many bugs, full campgrounds, also wrong turns. This particular trip had four of the aforementioned inconveniences.

    Lake Byllesby Regional Park is 23 miles from the Otso shop in Burnsville, or 40 miles if you plan a route that uses as many gravel roads as possible while remaining somewhat direct. The park itself is on a reservoir on the Cannon River, just east of the town of Cannon Falls. When I was a kid, my Cub Scout troop took yearly trips to the scout camp on the south side of the lake. This part of the state is known for brisk rivers and farm fields that yield to hardwood forests limestone bluffs. Our overnight trip would be my first time returning to the park in 25 years. I was excited.

    Then came the day of the trip. A cluster of storms rolled in by 2pm, just three hours before our planned departure time of 5pm. “It’ll pass and we’ll have perfect riding weather by the time we need to leave,” we thought. Three hours later, the rain was still coming down. With our bikes loaded up with gear, it would’ve been a heartbreaking defeat to unpack everything and reschedule. “Let’s leave at 6pm. It’s supposed to clear up by then,” became our next optimistic plan. We departed the shop at 6pm as planned, but the rain did not clear up. Instead, we biked for two hours through thick mist, drizzle, rain, and brief downpours.

    At 9:30pm, a full 90 minutes after our forecast arrival time, we rolled into Cannon Falls to find bar kitchens closed at 9pm. When you’re soaked and caked in mud and sand from the waist down while riding for over three hours, you rely on motivation to get you to your destination. That motivation for me was a bacon cheeseburger as my proverbial carrot on a stick and I sure as hell wasn’t about to let a kitchen closure crush my grilled dreams. Through some combination of shoddy salesman skills and survival mode, I was able to convince a cook to keep his grill fired up for one extra order. A round of double bacon cheeseburgers and pints of the finest house ales all around! This was the fourth time that food saved my life.

    By the time we paid up at the bar and headed to the campground, it was 11pm. A local junior sheriff deputy found it odd that five grown men were entering the park on bicycles. “You biked here from Burnsville? And you’re going to camp? Then you’re going to bike home in the morning?” The conversation was like convincing someone that Santa exists. After 30ish minutes, he left, allowing us to spend the night. It was 11:30pm by now.

    An early morning thunderstorm sat overhead from 3:30am-5am. The alarms that we set were no longer needed. Fortunately, the storm passed and we were able to pack up and head back to the shop by 6am. Three hours, 40 miles, five breakfast burritos, and four cups of coffee later, we rolled into Otso and Wolf Tooth HQ. A little exhausted from the trip, but ready for the day and our next bikepacking overnighter.

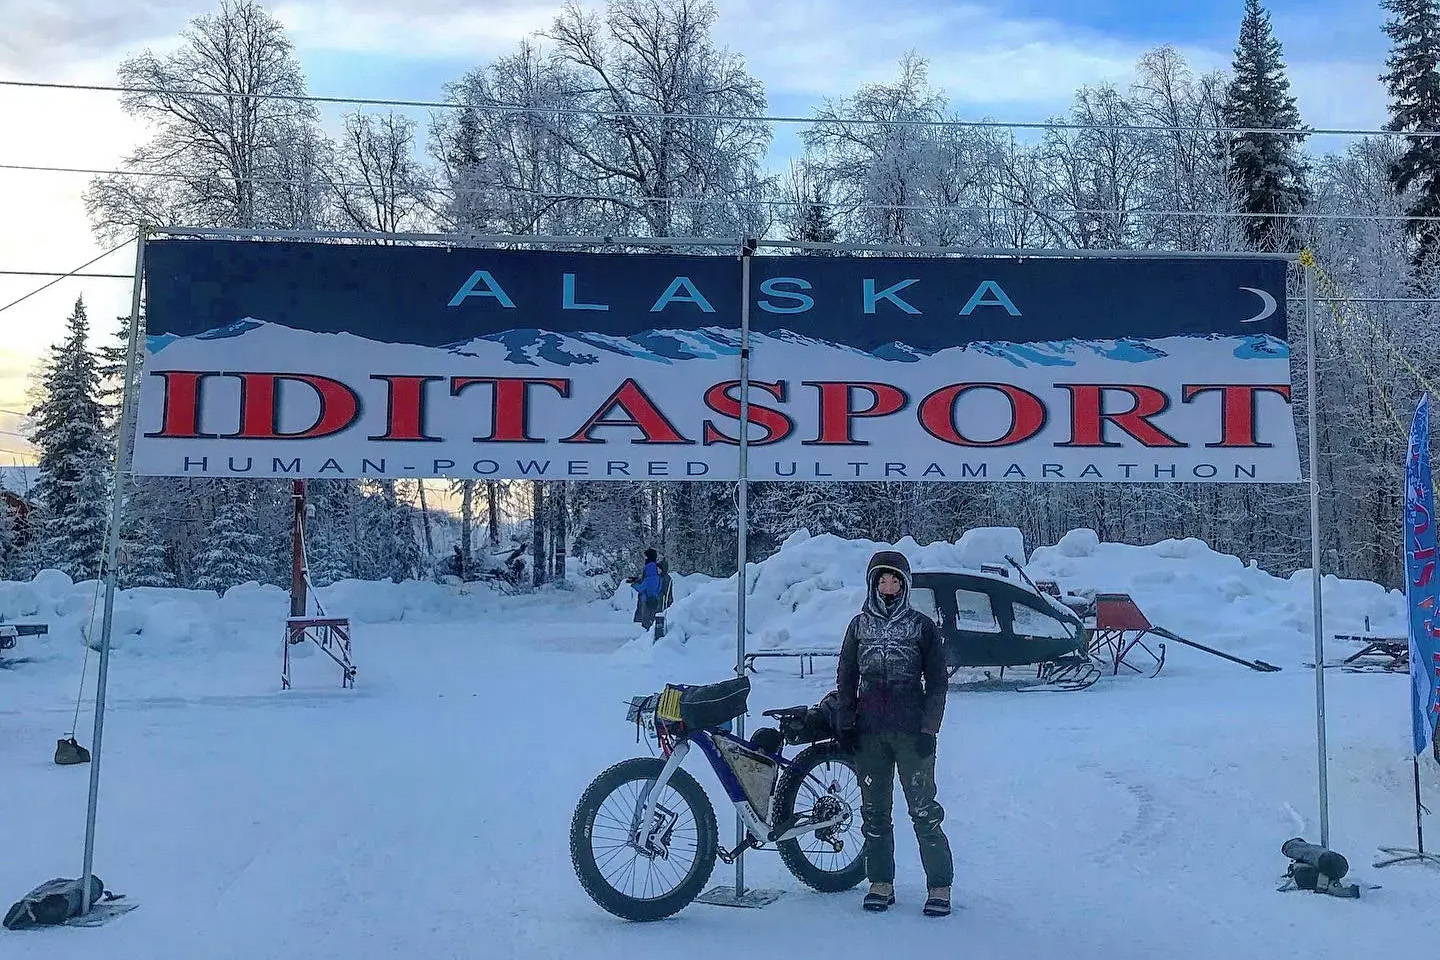
    My First Ultramarathon: Highlights from the Iditasport 2020

    Words and photos by Rachel Heath

    I’m standing at my desk scrolling through a social media platform, mind dulled with boredom as the mundanity of routine life seeps into my cells. I see a drone image of a group of cyclists riding across a snow-covered trail. “A group ride!” I think to myself. I’ve been spending a lot of solo time on the bike these days, failing to convince my friends and acquaintances that a subzero bike ride is a good time. It has been a particularly cold weather pattern in Southcentral Alaska for the last six weeks, and I feel lonely in my continuous pursuit of pedaling in miserable conditions.  

    But alas, a group ride! I clink the link. Oh, never mind, it’s a race. I don’t race. I investigate further—there’s an option for a 25 mile course. “I can do 25 miles”, I think. So I sign up for my first race ever: a fat bike race in Alaska in subzero temperatures. Five days later I cross the finish line of the Frosty Bottom: a well-attended fatbike race in the heart of Anchorage, Alaska. Lucky for me, the race fell on a sunny and warm (-8º F) Saturday morning. My years of experience backcountry skiing, ice climbing, and pursuing other cold-weather suffer-inducing sports prepared me well for a frigid bicycle ride across town.

    Now I’m just standing here, heavily mouth-breathing my own condensation with pale, frozen digits jammed deeply in expedition pogies full of hand warmers, pushing my bike on completely flat terrain to warm up my long-gone, Hothands-immersed toes. I liked the Frosty Bottom so much that I signed up for the next race—the Iditasport 2020: a true Alaskan winter human-powered adventure. The course is over twice as far and occurs in a more remote part of the already very isolated state of Alaska. The soft trail is ridden only by snowmobile and the occasional outdoor enthusiast. It is -26º F at the start. This is no Frosty Bottom.

    The mostly controlled panic attack I’ve been having for the last two hours as the sun drops behind the birch and the temperature plummets to -35º F is requiring a high volume of fluid to sustain, but my hydration bladder hose froze two hours ago and it’s another hour to the checkpoint. There is no blood in my arms or legs, let alone my hands and feet. I push the Voytek around a frigid corner of the Yentna River as the lead female cyclist pedals by, “Good work! You’re almost there!” she shouts. A few miles later I round the corner to see a snowy hill, and atop it sits a brilliantly lit rustic backcountry lodge: the Yentna Station, the checkpoint. Appendage circulation is near…

    Several weeks earlier I had leveraged my contagious and somewhat misguided enthusiasm to encourage one of my close friends to join me at the Iditasport. Todd Fisher is a certified, undercover Alaskan badass. He climbs ice and trad like no one his age (he’s 50), bikes hard in the summer and winter, and is a highly-skilled backcountry skier and mountaineer. He could flow through the route in one solid push, but I was too scared and too cold to continue through the night in the dangerous temperatures without an emergency shelter. Like the good friend that he is, he opted to delay his finish and stick with me until the next morning. Truth be told, neither one of us wanted to suffer that hard alone.

    The following day, my core temperature falls to that of the ambient air in the warming tent as the shivers set in, and a fellow racer crawls beneath an emergency bivy, her teeth-chattering and bones shaking. I sprint to the water station in search of hot water and hot coffee for her, burning my bacon on the propane stove. Hot water and hot coffee delivered, I slam the bacon, two sandwiches and a sleeve of Oreos. The shivers subside, so I usher to the volunteer physician to examine my toes. A Boston-native with a personal interest in mountain biking, the doctor-on-duty flew all the way to Alaska to assist racers with life-and-limb threatening emergencies. He inspected my toes and cleared me to continue to the finish, which was only 16 miles away.

    A few hours later, Todd is on my tail resisting the urge to push past. He knows I can’t keep up with him so he lets me pace us and slow us down to a crawl. Something about being in the cold (-25º F to -40º F) makes me tremendously sleepy. The desire to close my eyes kicks in so I slam a caffeine-infused Gu just in time as we push the last 10 miles to the finish. We complete the race in just over 27 hours. Admittedly, we spent many of those hours regaining feeling in our fingers and toes at aid stations and taking shelter in the Yentna Station. With a huge grin I bop excitedly into the lodge where the race began. We sit down for burgers: “THAT WAS FUN!” I squeal to Todd. He shakes his head and laughs, “you’re an odd duck, Rachel.”

    I’ve said I couldn’t accomplish much without other people before, but this time is no joke. I stand on the shoulders of giants. When I shared my completion of this short and cold race, everyone congratulated me as if this was a great accomplishment. I am only a product of the hard work, creativity, and ingenuity of others: innovations from industry leaders in cycling and cycling equipment (@otsocycles, @revelatedesigns), time-tested gear and outerwear (@ibexwool, @patagonia, @arcteryx, @sorelfootwear), directors, coordinators, and volunteers of races (@arcticcycles), and countless friends and supporters who lent me an item, gave me a tip, or inspired me by their own accomplishments (@thingsk8sees, @clintonak907, @badandyinak1, @dirtydak, @grande1017, @carbon10speed, @amymdunville). I truly believe that I stand on the shoulders of giants.